In my previous post, I told you how you can open a report through a page entry in just one click. In similar ways, you can schedule a report by just clicking the page entry, setting the Report parameters and then submit it for scheduling. Below are the steps which you need to follow:
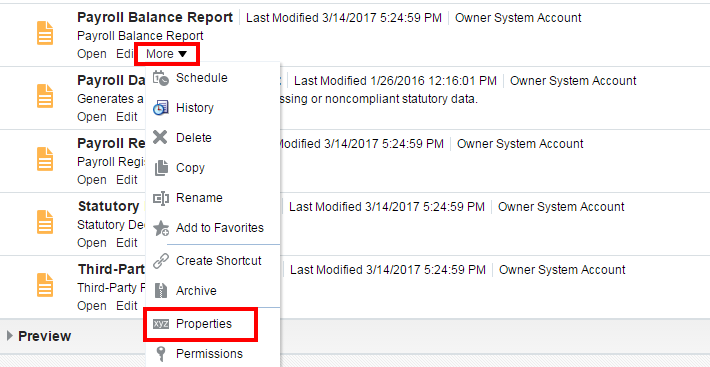
Suppose, you want to schedule the Payroll Balance Report (seeded one, you can follow the same steps for your custom report) . First thing that you need to do is to find out the navigation for that report or the path where the report is stored. This you can do by just going in the properties of the Report under More menu and view the location. Follow the screenshots.

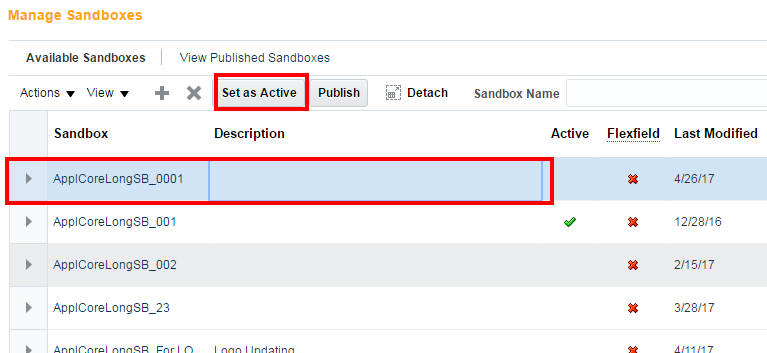
Click on Add Button and provide the Sandbox Name and click on Save and Close.

After your Sandbox is created, select your Sandbox and click on Set as Active.
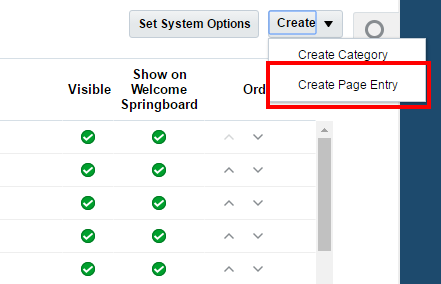
Now, you are eligible to create a Page Entry. Go to Navigator → Tools → Structure. Click on Create Page Entry under Create menu.
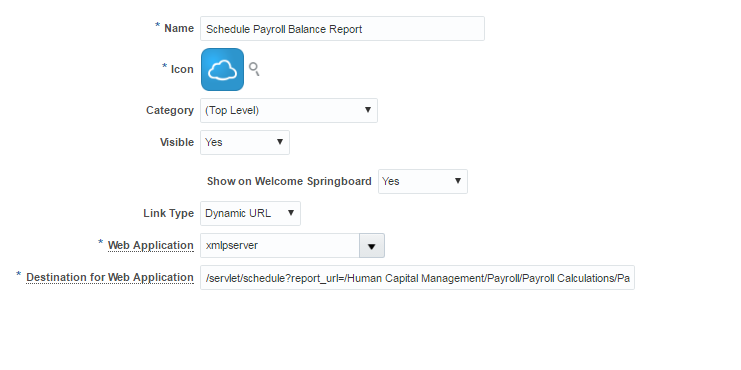
Fill the mandatory fields and select Dynamic URL (you can also select Static URL but Dynamic is preferred) in Link type field. Select xmlpserver in the Web Application field and paste the above path for the scheduling of the Report which you had prepared.
Click on Save and Close. Just make sure that, you are able to see your created Page entry.


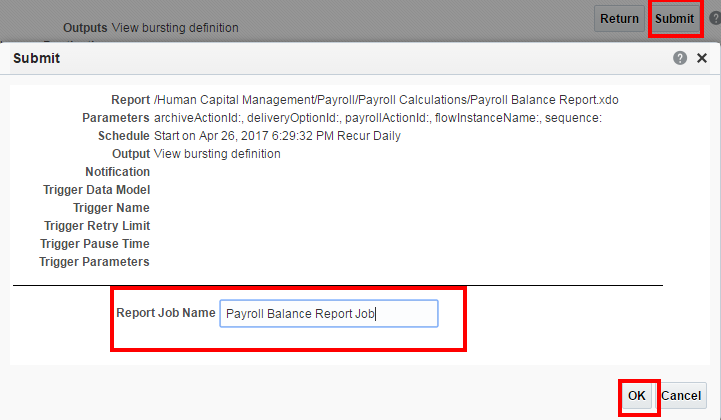
Click on Submit. Provide the Report Job Name and click on OK. The report will be scheduled.
If you are getting stuck and need any further help in the above steps or anything in Oracle Cloud Applications, just drop me a mail at shashank731@live.com.
If you liked this post, remember to share it with your friends and colleagues as well. See you Soon.
Happy E-learning.
Suppose, you want to schedule the Payroll Balance Report (seeded one, you can follow the same steps for your custom report) . First thing that you need to do is to find out the navigation for that report or the path where the report is stored. This you can do by just going in the properties of the Report under More menu and view the location. Follow the screenshots.
Copy the selected portion of the Location field which in this case is: /Human Capital Management/Payroll/Payroll Calculations
Now, add the report name to the location field which you just copied. So, the path of the report becomes /Human Capital Management/Payroll/Payroll Calculations/Payroll Balance Report.xdo. Remember to put .xdo which is the extension for report after the report name.
So, now you have the path of the report. But, it is still not the full path required for scheduling the report. To get the full path for scheduling, just put the above path in the <Report-Path> of:
/servlet/schedule?report_url=<Report-Path>&_xdo=<Report-Path>
/servlet/schedule?report_url=<Report-Path>&_xdo=<Report-Path>
Finally, the path for scheduling is:
/servlet/schedule?report_url=/Human Capital Management/Payroll/Payroll Calculations/Payroll Balance Report.xdo&_xdo=/Human Capital Management/Payroll/Payroll Calculations/Payroll Balance Report.xdo
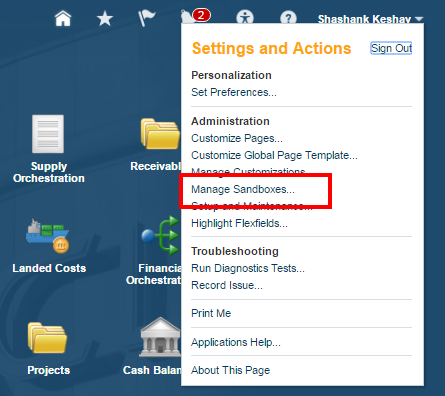
The next thing which you need to do is to create a Page Entry. For creating a Page Entry, you first need to activate a Sandbox. Follow the screenshots.
Click on your User Name and then click on Manage Sandboxes.
Click on your User Name and then click on Manage Sandboxes.
Fill the mandatory fields and select Dynamic URL (you can also select Static URL but Dynamic is preferred) in Link type field. Select xmlpserver in the Web Application field and paste the above path for the scheduling of the Report which you had prepared.
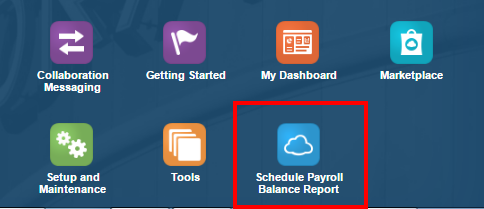
Now, go to the home page and you will see there an icon of your above created page entry for scheduling. Click on that.
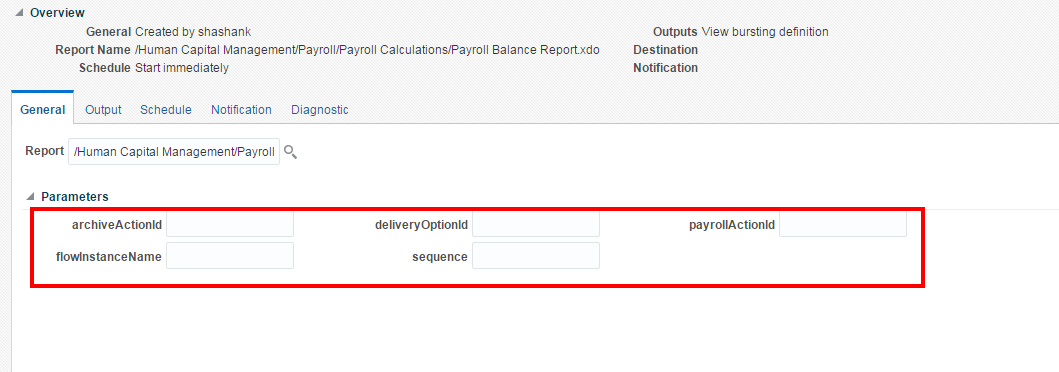
Fill the parameters of the Report in their respective fields in General tab.
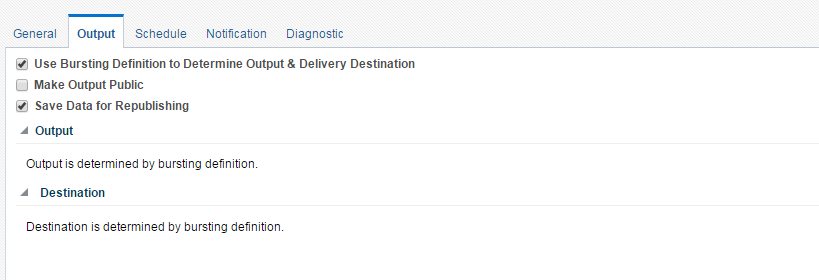
In the Output tab, select the Output of the Report and fill the Destination where the Output of the Report will be sent after the report is run at it's scheduled time. If Bursting definition is provided in the Data Model and Bursting is enabled, then you can check the "Use Bursting Definition to Determine Output & Delivery Destination" check box.
In the Schedule tab, set the frequency of the scheduling. If Bursting definition is provided in the Data Model and Bursting is enabled, then you don't have to worry about the Schedule Trigger, but if Bursting is not enabled then to avoid the sending of the mail in case no data is fetched from SQL Query, you need to define the Schedule Trigger in the Data Model and use it here.
So, you can schedule any seeded or custom reports through these simple steps directly from your home page.
If you liked this post, remember to share it with your friends and colleagues as well. See you Soon.
Happy E-learning.
No comments:
Post a Comment